
By Keith Rawlinson
illustrations by nate skow; opposite photo, istockphoto.com/marcin pawinski
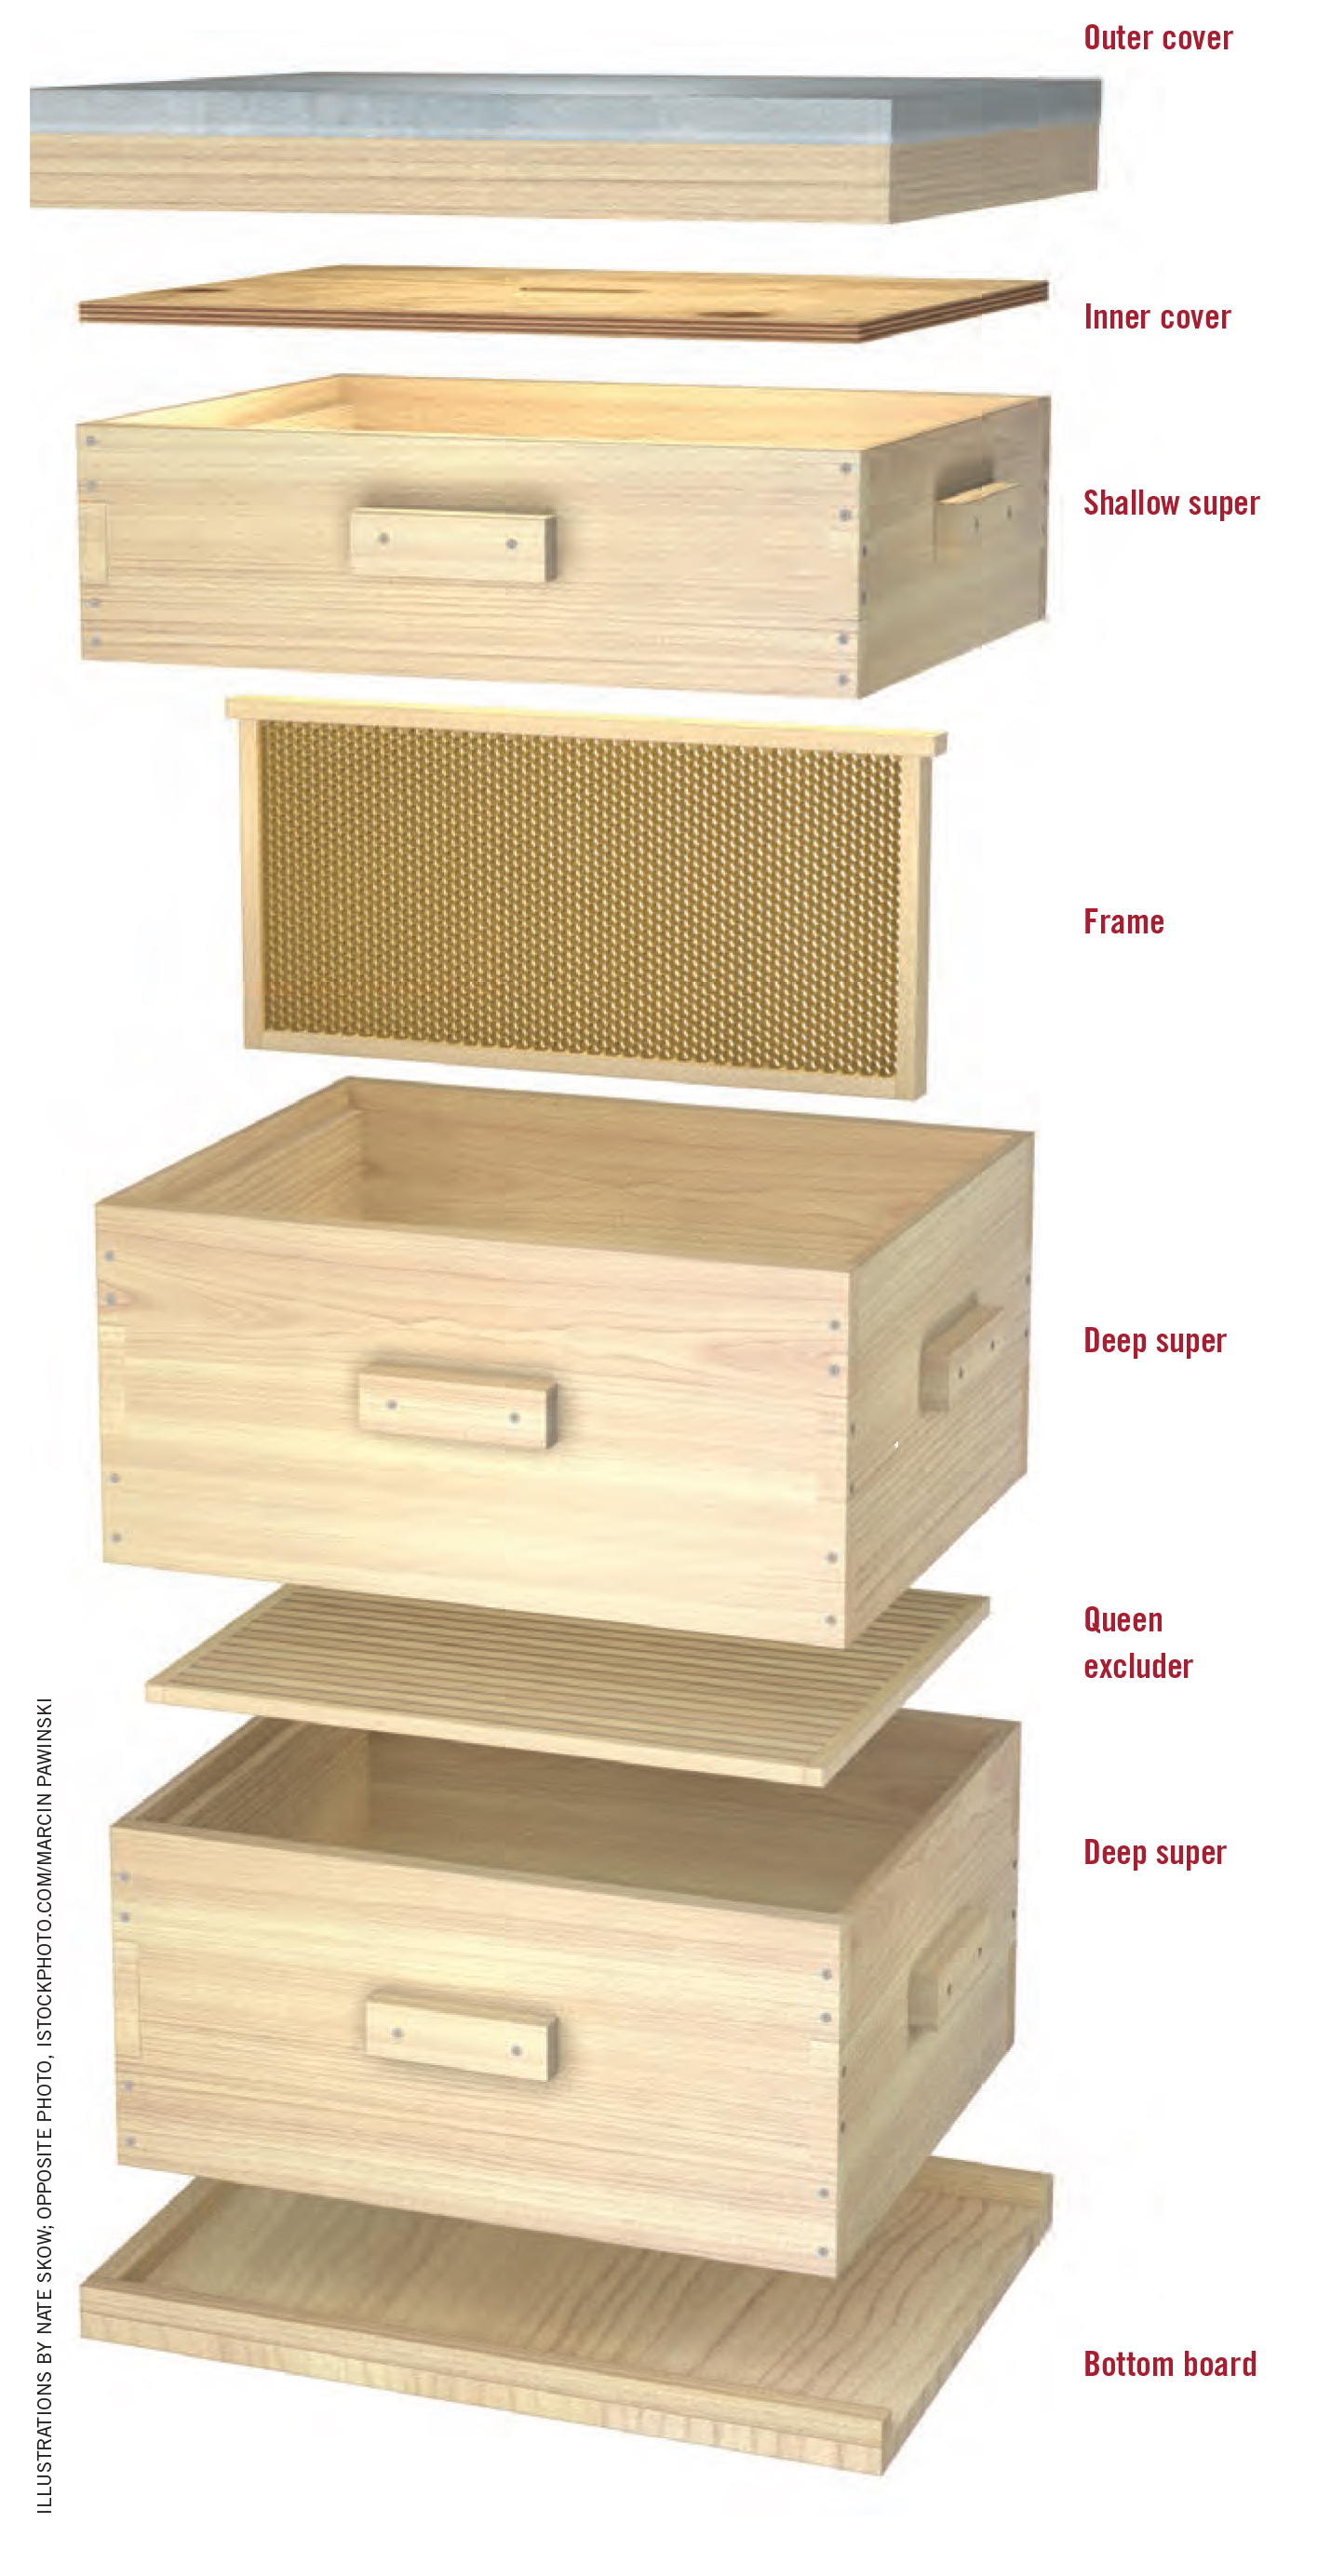
Keeping bees is a good, sure way to put some extra money in your pocket, pollinate your crops, and stock your pantry with honey. While you can purchase all the equipment you’ll need to begin keeping bees, hands-on folks may prefer to build their own hives. Not only will this save you some cash, but it’ll also give you an understanding of the inner workings of the place your bees will call home. (See diagrams of the supers and covers, and bottom board, at right.)
• All items within this set of plans are built with 3⁄4-inch boards and plywood. The type of wood is really not all that important, so I generally use the cheapest I can find, as long as the wood is solid and without cracks.
• It is extremely important to make sure all eight corners of each super are matched up before driving any nails. After the glue is applied and the joints are slipped together, match up each corner, one by one, and drive in the nail closest to the matched corner to hold it in place while you nail the remainder of the joint. This is especially necessary if working with slightly warped or cupped boards. Straight boards are generally no problem.
• When nailing the top corners of the supers, be sure to place the corner nail down low enough so that it does not go into the rabbet joint instead of the wood itself.
• Remember, it is always a good idea to use plenty of waterproof wood glue when assembling beekeeping equipment. It’s better to use too much rather than too little; you can always wipe off the excess, so be generous!
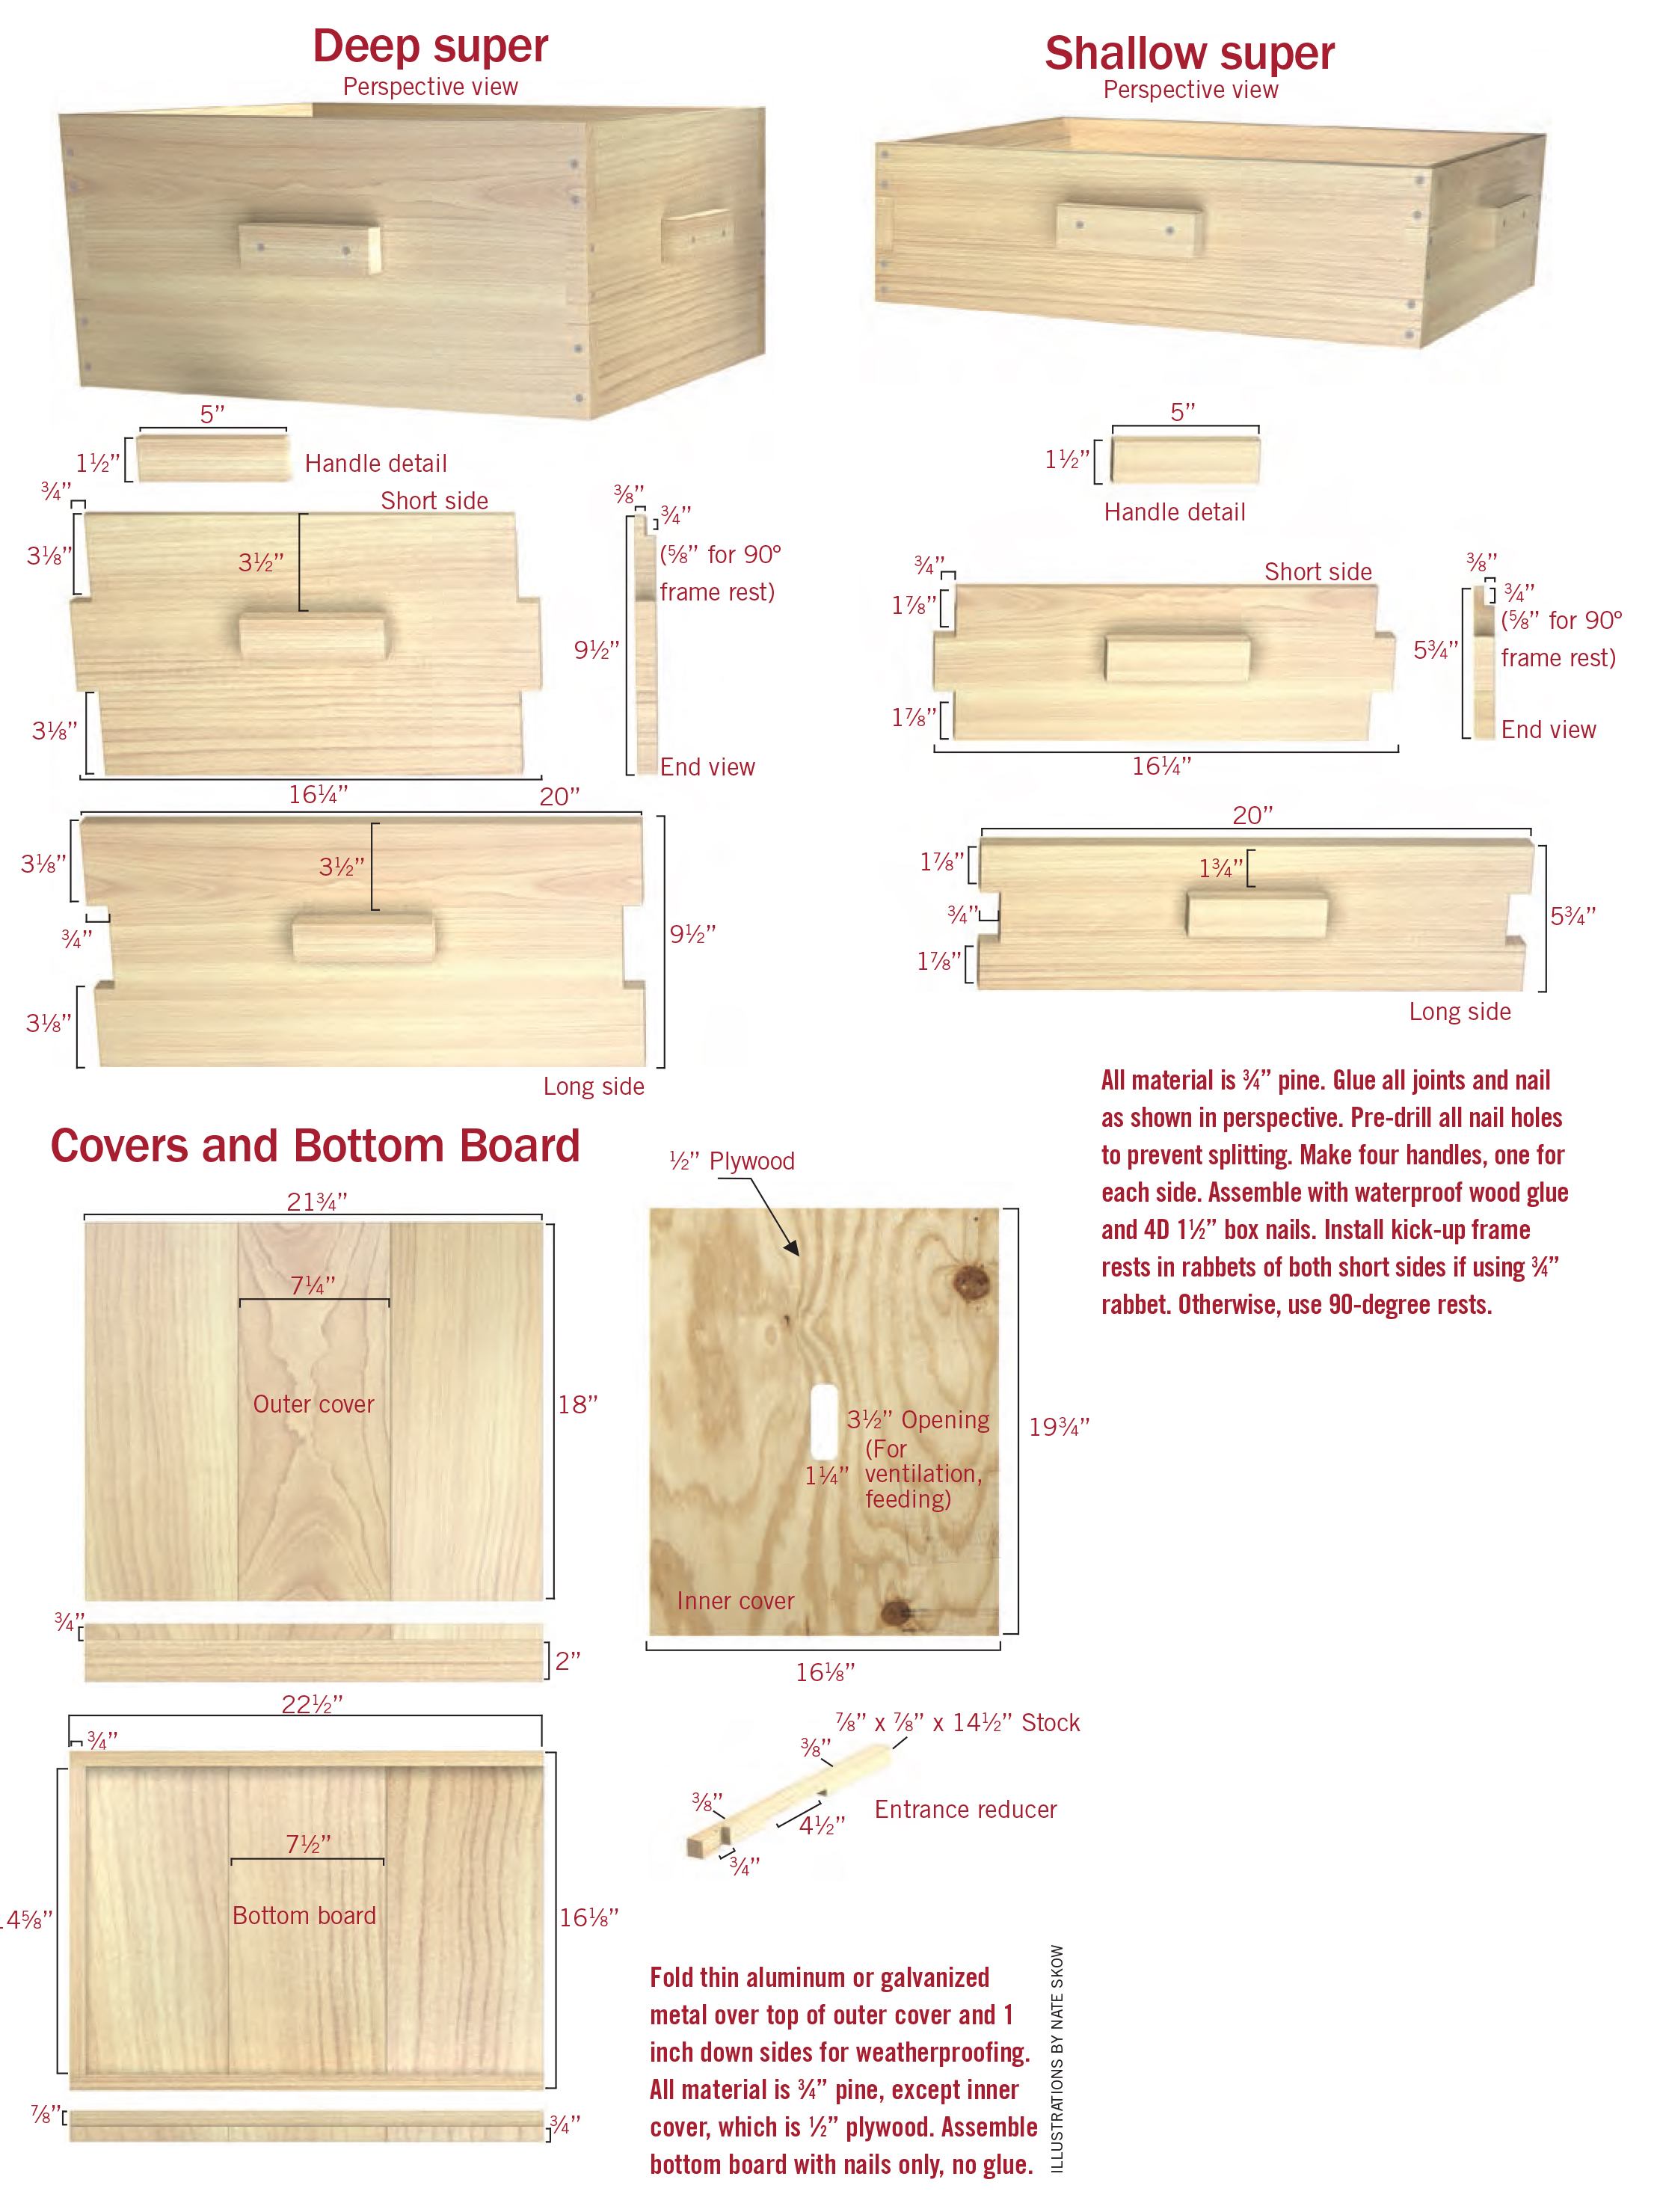
All material is 3⁄4” pine. Glue all joints and nail as shown in perspective. Pre-drill all nail holes to prevent splitting. Make four handles, one for each side. Assemble with waterproof wood glue and 4D 11⁄2” box nails. Install kick-up frame rests in rabbets of both short sides if using 3⁄4” rabbet. Otherwise, use 90-degree rests. Fold thin aluminum or galvanized metal over top of outer cover and 1 inch downsides for weatherproofing. All material is 3⁄4” pine, except inner cover, which is 1⁄2” plywood. Assemble bottom board with nails only, no glue. Illustrations by Nate Skow.
• The deep and shallow supers are put together with what I call a “tab joint” (really a modified box joint). It’s nearly as strong as the finger joints used on commercially made equipment but is much easier to make and requires no special tools.
• It may appear at first glance that some of the dimensions are not called out in the plans. However, any that are not directly marked can be calculated from those that are.
• Paint the equipment with exterior latex paint. White is the most common since a light-colored hive tends to stay cooler during summer. Spend the extra money and get a high-quality paint. It’ll pay you back in the longevity of the equipment. Apply at least two coats, preferably three or four.
• You can shield the outer cover with some sort of sheet metal if you wish, but with adequate paint, the extra covering becomes optional.


24 Comments
I am a beginner and trying to figure out all the different sections of a bee hive.
Your pictures are to small for me to read the print. I can’t identify what I am looking at and my phone won’t let me make it bigger. 🙁
OK, thanks for the comment. I believe we’ve solved that problem now!
As to “Build your own bee hive”. The illustrations are useless in their current form they are too small to see or read. Enlarging them does not correct the issue. Kinda defeats the purpose of the article! FYI
OK – I just uploaded massive versions of the images, and they should be correct now?
[…] by nate skow via http://keepingbackyardbees.com/build-beehive/ We don’t use a queen excluder, but everything else if pretty much how our hive is set up for […]
works great, thanks for sharing your hard work!
Thank you for the beehive building information. We are very interested in starting a few beehives. For the others that are trying to print out the directions…I printed my off at 30%. I could not read the directions on my computer but it did print out one very legible page perfectly.
This is nice, What about plans of how to make the frames for the hive??
I’m very interested in getting an hive or two, and would appreciate any help or advice for centeral Washington.
I built this hive this past weekend and cannot find frames for this size box. These plans have a 3/4″ rabbet and are 9 1/2″ tall instead of 9 5/8″ with a 3/8″ rabbet on the deep super. The shallow super is 5 3/4″ tall with a 3/4″ rabbet. Shallow supers are 5 5/8″ with 3/8″ rabbets. Can somebody please help me find frames? Am I not understanding something? I hope I did not spend my weekend making firewood.
Are these dimensions for an 8 frame setup or a 10 Frame setup?
How do you make the frames and from what material?
Thanks
I am unable to enlarge the picture, so I can read any of the print around the wood pieces. So I can figure out enough to to be able to build it. Any help woul be appreciated
Opened in lap top and got the bigger picture. Disregard my last
You can do like I did. Buy a deep and medium super. The basic,/ standard langstroth type then take your exact measurements from those. Then you can also buy the to put together they cost about a dollar a piece
Sorry what I ment to say, buy 1 deep and one medium super. They cost about 15 dollars a piece. The standard langstroth style. Then take all your measurements from those, and then you can buy the frames just about anywhere for about a dollar a piece. Then your all set
Hi, I really enjoyed reading thru this article and found it very informative,
Things I’m battling with is, I work in metric,
How does the beehive vent thru the lid, I see the hole and air space but how does it vent thru the lid without bees using it.
What is the dimensions of the queen extruder holes.
Can we have more information on the frames.
Thanks
If would have been nice to see this plan in PDF.
looking for detailed plans for building a AZ hive
Just starting out as well and was wondering if you paint the inside of the super as well as the outside? Would it hurt the bees , if you did?
Thanks
Hello Al,
We suggest only painting the outside.
Best,
KBB Team
Your pic cannot be zoom,the numbers are too small Could you send me the picture to my email? Thank you.
Can I get these dimensions in metric, I’m from South Africa and we don’t use imperial measurements, the metric version showing here is tooooooo small to read
Thanks
Can this design box be put in a 55 gallon plastic container (with 2 lid openings) in South Florida? (NOTE: water barrel size) stackable? Thanks