
 by Jennifer Sartell of Iron Oak Farm
We’re fast approaching the Winter Solstice, the shortest day of the year. With the lack of sunlight, Zach and I like to light candles in the evenings. It creates a warm, soft glow of natural light and makes the dark winter nights more cozy.
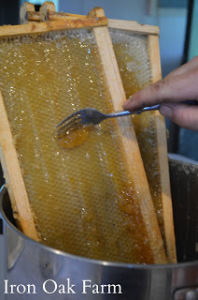 When I make candles I like to use beeswax from our honey bees. The candles burn long and evenly with little to no drips. The wax also gives a wonderful, soft honey scent. After we scrape our frames and most of the honey drips away from the wax, I heat the wax and let it re-solidify.
 The wax forms on the top, with the honey below. The wax can be removed and rinsed off for use in candles.
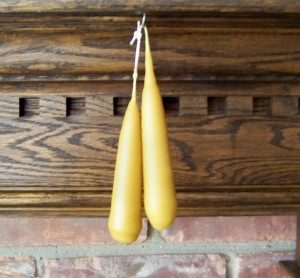
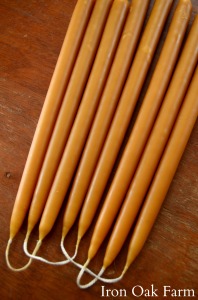 Because it takes time for the wax to melt and to get things set up, I like to make candles in big batches. Enough to give as gifts and to last throughout the year. I store them by wrapping in tissue paper and in an air tight container. This helps preserve the color and scent of the candles.
CAUTION: Making candles puts you at risk of being burned. Please take caution when working with hot wax and boiling water. The double boiler system sometimes bubbles, steams and spatters as air gets trapped under the dipping container. Keep the heat on low and do not let the water come to a rapid boil. Please use caution and common sense and create at your own risk.
To make these candles you will need:
pure beeswax
a tall metal container for dipping
a pan with water for the stove
braided cotton wick (found at craft stores)
scissors
metal nuts
a place to hang the candles to dry
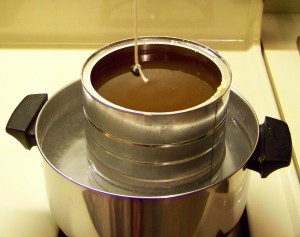
Wax melts best in a double boiler system. This prevents the wax from overheating and destroying the natural oils. The hotter the wax is melted, the harder it will form and your candles will be more prone to drips when lit.
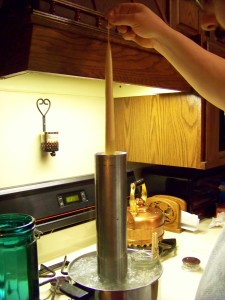 Place your tall metal container inside a pot on the stove filled about 1/3 of the way with water. My husband is handy with metal so he welded this long pipe for me so I could make extra long candles, but a recycled coffee can or olive oil can would work fine. Keep in mind, the larger your container, the more wax you will need to reach your desired height.
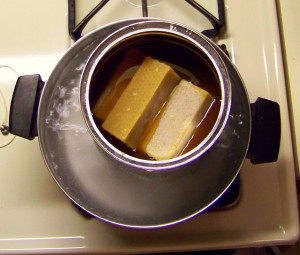 Fill the inner container with wax leaving about 2 inches from the top. Allow the wax to melt in the double boiler with the stove burner on low. Check the water level often and add water if it steams away.
Preparing the wicks:
It’s easiest to make candles two at a time. Not only is it faster, but the length of wick between the two candles acts as a perfect place to hang the candles to dry between dips.
Your candles will be as long as your melting container is high, and how full it is with wax.
Determine this height, multiply it by two (for two candles) and add 4 inches. The 4 inches will give you room to tie on the nuts and for the space between for hanging.
 Tie a metal nut on each end of the wick. This will act as a weight in the early dipping layers to keep the wick straight.
Make several of these so you can alternate while other candles are drying.
Hold the length of wick at the half way point and slowly dip the wicks into the wax. Lower till you almost reach the bottom of the container, and slowly pull out.
Carefully hang the candles to dry. Two chairs with a yard stick works fine for a drying rack.
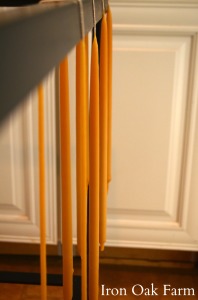 While these are drying, dip the next set of wicks, and so on. I work in an assembly line so that by the time all the wicks are dipped once, the first ones are dry and it’s time to start over again.
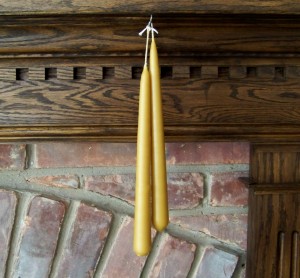 Keep building the wax until the candles are about 1/2 inch thick. You should then be able to snip off the nuts and use your fingers to form the warm wax into shapely ends. Continue dipping until your candles reach the desired width.
 Note: As you dip candles, the wax levels in the pot will start to drop. Add chunks of wax as needed to replenish your levels.


6 Comments
i have started to red your documents with lots of interest.we are fulltime bee practitioners but the reading i get is refreshing and also beefing our already informed minds.
i
I absolutely DETEST websites that use popups that completely cover the page without a way of getting out of them other than by clicking on the f—ing thing!!!!!
I refuse to deal with any page or business that uses this type of advertising!!!!
You will notice I have UNSUBSCRIBED (several times) tonight, and hope the site goes belly up…just as so many bees are doing.
Why would you be so damn stupid as to use that kind of CRAP ADVERTISING?????
FYI: your posts won’t pin to Pinterest — they dont seem to like your pics
FYI: your posts won’t pin to Pinterest — they dont seem to like your pics
Could you state what size wicks to us.e please. I made some small candles and they burned unevenly and the wicks went out before the candle burned down. Thanks, Love your info